Updated to CS 2.1 SP2 today. Please let me know of any problems.
Thursday, 4 January 2007
Friday, 1 December 2006
ebay Broken?
Good start to the day, I need to buy some stuff for Christmas and ebay seems broken for me:

That's happening for every item so I wonder how much money they are losing?
Managed to see the item a few seconds later, bought it, but got this:


That's happening for every item so I wonder how much money they are losing?
Managed to see the item a few seconds later, bought it, but got this:

Wednesday, 29 November 2006
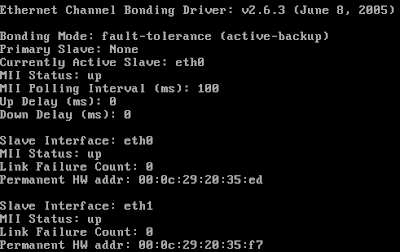
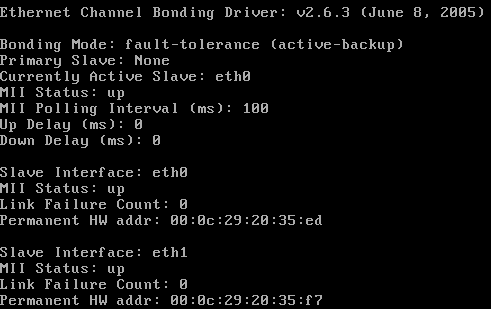
Linux NIC Bonding
I had a query on how to setup NIC bonding in RHEL4 so thought I would document it for the blog.
I'll start with a standard server with 2 NICs, eth0 and eth1. Here is the output from 'ifconfig':

The configuration scripts are found in /etc/sysconfig/network/network/scripts:

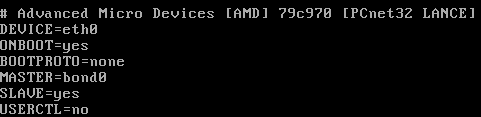
eth0 is a static interface configured in /etc/sysconfig/network/network-scripts/ifcfg-eth0:

eth1 is a static interface configured in /etc/sysconfig/network/network-scripts/ifcfg-eth1

The hardware is configured in /etc/modprobe.conf:

First we add a config file for bond0, /etc/sysconfig/network/network-scripts/ifcfg-bond0:

Now we edit /etc/sysconfig/network/network-scripts/ifcfg-eth0:

Now we edit /etc/sysconfig/network/network-scripts/ifcfg-eth1:

Network scripts are now complete in /etc/sysconfig/network/network-scripts:

Add the bonding driver to /etc/modprobe.conf:

Shut down the network with 'service network stop'
Insert the bonding driver with 'modprobe bonding -o bond0 miimon=100 mode=1'
Start the network with 'service network start':

Check the interfaces with 'ifconfig':

Check the routing is ok with 'route -n':

I'll start with a standard server with 2 NICs, eth0 and eth1. Here is the output from 'ifconfig':


eth1 is a static interface configured in /etc/sysconfig/network/network-scripts/ifcfg-eth1


Now we edit /etc/sysconfig/network/network-scripts/ifcfg-eth1:


Shut down the network with 'service network stop'
Insert the bonding driver with 'modprobe bonding -o bond0 miimon=100 mode=1'
Start the network with 'service network start':


Check the routing is ok with 'route -n':
View the status with 'cat /proc/net/bonding/bond0':
Tuesday, 28 November 2006
IE7 Download Corruption
I have a particular file that I needed to download but IE7 consistantly corrupts it. It works fine with Firefox 2 and Free Download Manager. There is a strange dialog at the end of the download. This is a Print Screen capture:

It's not quite accurate because the progress bar is still there on the screen and there is a quarter of a (close?) button at the right hand end of the of where the progress bar would end.

I took a photo because I didn't seem able to Print Screen the dialog properly (bits were missing as above)

It's not quite accurate because the progress bar is still there on the screen and there is a quarter of a (close?) button at the right hand end of the of where the progress bar would end.

I took a photo because I didn't seem able to Print Screen the dialog properly (bits were missing as above)
Friday, 24 November 2006
The Office Open XML file Building Blocks.dotx cannot be opened because there are problems with contents
I had a real problem with B2 Technical Refresh of Office 2007 not allowing me to insert page numbers, giving me the error message "The Office Open XML file Building Blocks.dotx cannot be opened because there are problems with contents."
Thanks to "PJ-DJ" I found the answer here:
http://forums.microsoft.com/TechNet/ShowPost.aspx?PostID=932036&SiteID=17
Step 1: Close Word and Outlook if you are using Word as your email editor.
Step 2: Go to C:\Documents and Settings\(Username)\Application Data\Microsoft\Document Building Blocks\1033 and delete the Building Blocks.dotx file.
Step 3: Open Word. CLOSE IT AGAIN. Wait a few seconds.
Step 4: Open Word. On a blank document, Insert Page Numbers. Check your C:\Documents and Settings\(Username)\Application Data\Microsoft\Document Building Blocks\1033 folder. A new Building Blocks.dotx file should have been created.
Step 5: There is no Step 5. You should be fine now.
I really must get that licensed copy of Office 2007 installed - But I'm not sure if Sharepoint designer is released?
Thursday, 23 November 2006
Gissa Job?
Things aren't going too well at work - The direction the company wants to take and the direction I want to take do not match!
Anyone need a technical type of guy?
I prefer to work around the Ipswich, Suffolk area and you can find a general purpose CV in PDF format here.
If you need it in another format, give me a shout.
Anyone need a technical type of guy?
I prefer to work around the Ipswich, Suffolk area and you can find a general purpose CV in PDF format here.
If you need it in another format, give me a shout.
Sunday, 12 November 2006

Saturday, 28 October 2006
CS2.1 Review Comments does not display correctly in IE7
I have to review comments before I allow them to be posted on the site because, as all blog owners know, you get a lot of spam comments. IE7 doesn't want to let me review them in lower resolutions. I get a cut off review line with no horizontal scroll bar. See what I mean here.
Firefox 2.0 fares better. It wraps the comment line and lets me scroll the windows horizontally if I have a long comment title. The colours are a little bit weird but I can live with that. See how Firefox 2.0 copes here.
I've posted a bug to the support forum so lets see how that does.
Firefox 2.0 fares better. It wraps the comment line and lets me scroll the windows horizontally if I have a long comment title. The colours are a little bit weird but I can live with that. See how Firefox 2.0 copes here.
I've posted a bug to the support forum so lets see how that does.
Sunday, 15 October 2006
Vista and Outlook 2007 - Turn off the reading pane
I really don't get on with the Outlook 2007 reading pane because it uses up to my screen real estate on my laptop. I knew that you can turn it off with the "/nopreview" switch at the command line but you can't edit the special icon to change the startup command line.
I did a bit of digging and found that by selecting the "Command Line" option from the Task Manager "View > Select Columns..." entry you could see the actual command lines used to start processes. I could see that Outlook was already starting with the "/recycle" switch to reuse Outlook instances so I set out to find this in the registry.
To start Outlook with the "/nopreview" switch I edited the following registry entry. (Insert standard disclaimer here!) The registry key was:
HKLM\SOFTWARE\Clients\Mail\Microsoft Outlook\shell\open\command
REG_SZ: "C:\PROGRA~1\MICROS~3\Office12\Outlook.exe" /recycle /nopreview
Sunday, 1 October 2006
Exchange Server 2007 Beta2 Maximum Mail Stores
I was trying to work out the limits of the current beta of Exchange 2007 in terms of storage groups and mailbox stores and through experimentation I discovered that they are:
- Maximum Storage Groups: 50
- Maximum Mail Stores per Storage Group: 5
Grant full mailbox permissions in Exchange 2007 Beta2
Final step upon upgrading the test server to Exchange 2007 Beta2 was to give me full access to all the mailboxes. It's another Power Shell task and I managed to find the syntax at the Microsoft Exchange Team Blog.
Add-MailboxPermission mailbox -AccessRights FullAccess -user user
This gives user full access permisions to mailbox.
Add-MailboxPermission mailbox -AccessRights FullAccess -user user
This gives user full access permisions to mailbox.
Exchange 2007 Beta2 - Allow hub connector to receive unauthenticated SMTP mail
You need to set the permissions to allow Anonymous users to submit mail. This is not in the GUI so you must use the Power Shell.
1. Set the permission:
set-receiveconnector 'Default CHEF' -PermissionGroups:"ExchangeUsers,ExchangeServers,ExchangeLegacyServers,AnonymousUsers"Replace CHEF with your Exchange server name!
2. Verify the permission:
get-receiveconnector | format-listSchema: Microsoft.Exchange.Data.Directory.SystemConfiguration.ReceiveConnectorSchema
AuthMechanism: Tls, BasicAuth, BasicAuthPlusTls, ExchangeServer
Banner:
BinaryMimeEnabled: True
Bindings: {0.0.0.0:25}
ChunkingEnabled: True
DefaultDomain:
DeliveryStatusNotificationEnabled: True
EightBitMimeEnabled: True
EnhancedStatusCodesEnabled: True
ExternallySecuredAsPartnerDomain:
Fqdn: mail.thefoleyhouse.co.uk
Comment:
Enabled: True
ConnectionTimeout: 00:10:00
ConnectionInactivityTimeout: 00:05:00
MessageRateLimit: unlimited
MaxInboundConnection: 5000
MaxInboundConnectionPerSource: unlimited
MaxInboundConnectionPercentagePerSource: 100
MaxHeaderSize: 64KB
MaxHopCount: 30
MaxLocalHopCount: 3
MaxLogonFailures: 3
MaxMessageSize: 10MB
MaxProtocolErrors: 5
MaxRecipientsPerMessage: 5000
PermissionGroups: AnonymousUsers, ExchangeUsers, ExchangeServers, ExchangeLegacyServers, CustomPipeliningEnabled: True
ProtocolLoggingLevel: None
RemoteIPRanges: {0.0.0.0-255.255.255.255}
RequireEHLODomain: False
RequireTLS: False
Server: CHEF
SizeEnabled: True
TarpitInterval: 00:00:05
AdminDisplayName:
ObjectCategoryName: msExchSmtpReceiveConnector
ExchangeVersion: 0.1 (8.0.535.0)
CurrentObjectVersion: 0.1 (8.0.535.0)
Name: Default CHEF
DistinguishedName: CN=Default CHEF,CN=SMTP Receive Connectors,CN=Protocols,CN=CHEF,CN=Servers,CN=Exchange Administrative Group (FYDIBOHF23SPDLT),CN=Administrative Groups,CN=The Foley House,CN=Microsoft Exchange,CN=Services,CN=Configuration,DC=thefoleyhouse,DC=ad
Identity: CHEF\Default CHEF
Guid: 0675a1d2-9c19-4068-af33-782d1c27f562
ObjectCategory: thefoleyhouse.ad/Configuration/Schema/ms-Exch-Smtp-Receive-Connector
ObjectClass: {top, msExchSmtpReceiveConnector}
OriginalId: CHEF\Default CHEF
WhenChanged: 01/10/2006 19:58:31
WhenCreated: 30/09/2006 00:19:26
ObjectState: Unchanged
OriginatingServer: chef.thefoleyhouse.ad
IsReadOnly: False
Id: CHEF\Default CHEF
IsValid: True
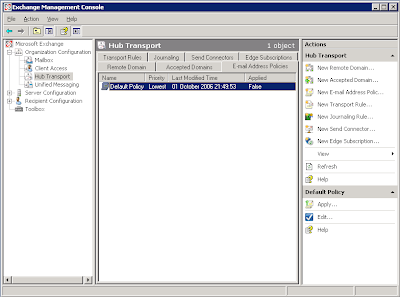
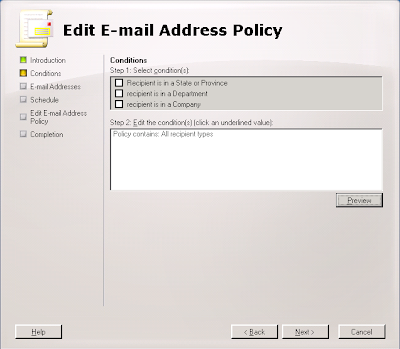
How to set recipent email addresses in Exchange 2007 Beta2
To set recipient email address policy, do the following:
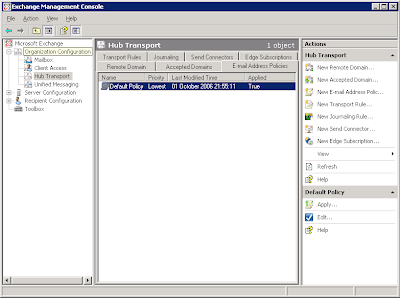
1. In the Exchange Management Console, navigate to 'Organization Configuration' > 'Hub Transport' > 'Email Address Policies'. Here you will see the default policy and you can select 'Edit' on the left hand side of the MMC console.
2. We are editing the default policy so just click 'Next'.
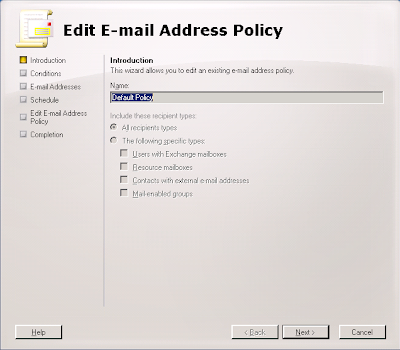
3. Again, just select 'Next' because we are editing the default policy for all objects.
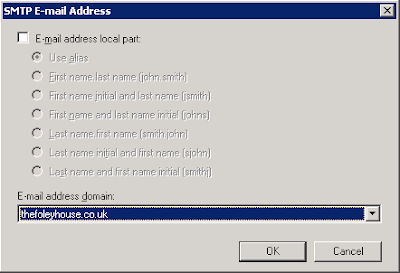
4. Now edit the default email address. Because mine is set as an alternate UPN I can click the SMTP address and click 'Edit'.
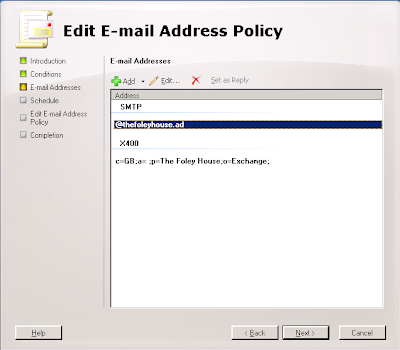
5. As the email address I want to use is an alternate UPN and can select it from the drop down box and select 'OK'.
6. Click 'Next' to apply changes immediately.
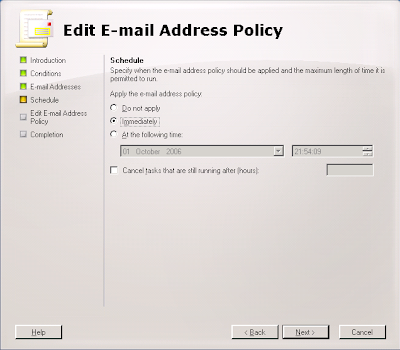
7. Click 'Edit' to make the changes.
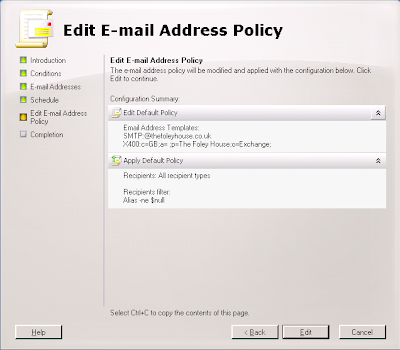
8. This dialog shows the Power Shell script along with any warnings. I have an invalid recipient name from my old Exchange 2003 organisation that I must get round to changing! ;-)
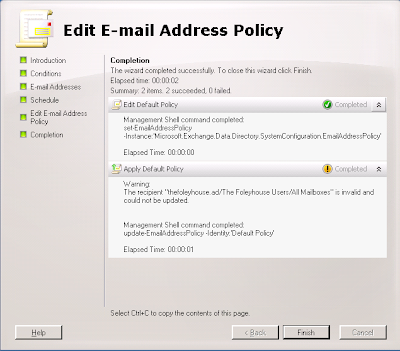
9. All done and applied. I like how the 'True' display lets you know that you did apply the policy.
1. In the Exchange Management Console, navigate to 'Organization Configuration' > 'Hub Transport' > 'Email Address Policies'. Here you will see the default policy and you can select 'Edit' on the left hand side of the MMC console.

2. We are editing the default policy so just click 'Next'.

3. Again, just select 'Next' because we are editing the default policy for all objects.


5. As the email address I want to use is an alternate UPN and can select it from the drop down box and select 'OK'.


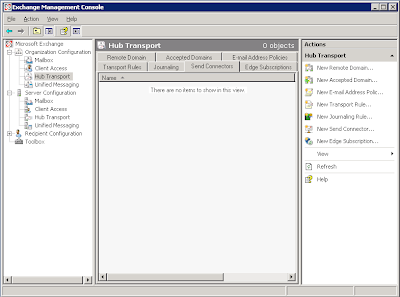
Creating an Internet send connector in Exchange 2007 Beta 2
Before you can send mail to the internet with a single server you have to make a connector for your mail transport hub role. The remote domain should already be configured to '*' for the Internet but create a send connector like so:
1. Open up the Exchange Management console and select Organization Configuration > Hub Transport and click 'New Send Connector...' underneath Actions, Hub Transport on the right hand side.
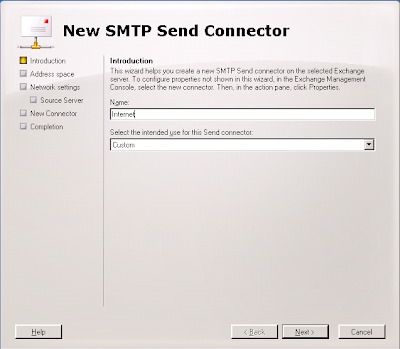
2. You should now get the 'New SMTP Send Connector' dialog box. Enter 'Internet' for the name and leave the intended use at 'Custom' for this connector.
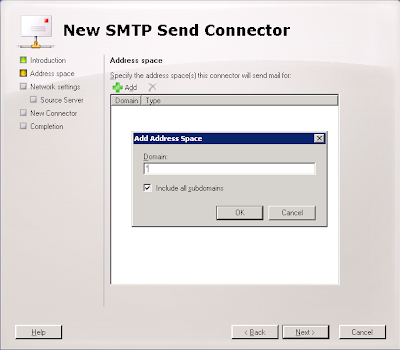
3. Next, for the Domain enter '*' and ensure that you leave 'Include all subdomains' selected.
4. Next, choose if you are going to use a smarthost or MX records to deliver mail. Because a lot of administrator block dynamic IP addresses and this test server has a dynamic address I have elected to use my ISP mail server. They relay mail from my IP address and I have used the DNS name of the server to simplify the connection.
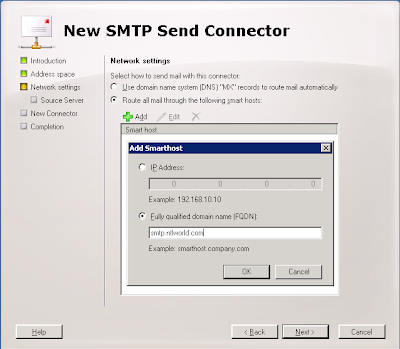
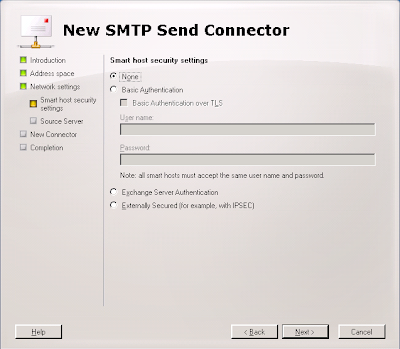
5. Next, if you need to authenticate to your smart host, put the details in here. I don't.
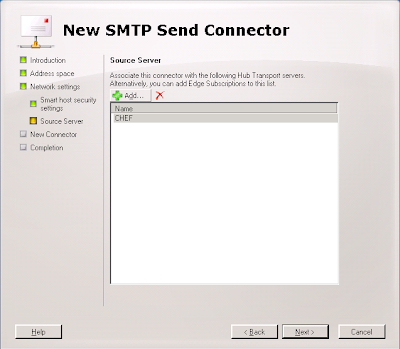
6. Next, select the server that will send mail over the connector. If you only have one server it should already be added.
7. Next, verify the settings.
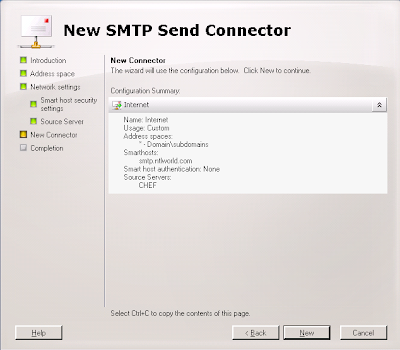
8. Next, create the connector. Beta 2 lists the Power Shell command you could have used to create this connector from the command line.
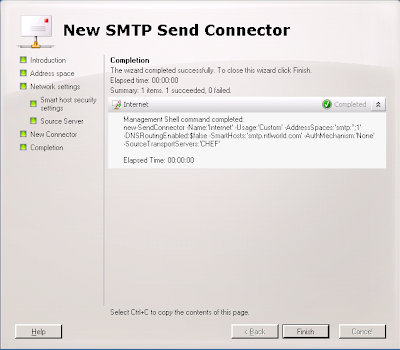
9. All done.
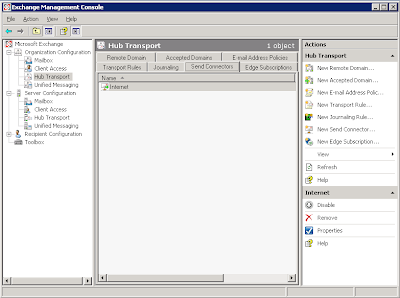


3. Next, for the Domain enter '*' and ensure that you leave 'Include all subdomains' selected.


9. All done.

Updating a single Exchange 2003 server to Exchange 2007 Beta 2
I've done this on my test server and there are a couple of problems you have to deal with:
- The databases are not compatible. Exchange 2003 uses STM and EDB files with 5MB logs whereas Exchange 2007 uses just an EDB file with 1MB logs. There may also be a difference on how data is organsied internally. I have seen reports of 4KB vs 8KB database pages.
- Exchange 2007 really needs an edge server role for secure deployment. If you're going to use a single server then you'll have to use the hub transport server to send and receive internet email. Allthought his works, it is not a reccommended scenario.
- Backup everything.
- Backup everything again using a different method. :)
- Extract the mail from the old Exchange 2003 server using a tool such as ExMerge.
- Disable\Delete all old mailboxes from mail stores.
- Uninstall Exchange 2003.
- Install Exchange 2007 using the mailbox, client access and hub transport roles.
- Set recipient policy to ensure correct email addresses are allocated.
- Re-enable mailboxes.
- Test internal mail connectivity using owa.
- Import mail. As it was a small test organisation and I had removed the old server I used Outlook for each user to import thier own mail. If I had a new server then I could have installed it into the Exchange 2003 organisation and used the move mailbox wizard.
- Create an SMTP send connector.
- Allow unauthenticated SMTP connections on the incoming (default) SMTP connector.
- Setup any mailbox permissions you wish to have.
Friday, 29 September 2006
Exchange 2003 will not uninstall with error 0x8000ffff
Ok, I have a development server that runs Exchange 2003 as a testbed but I wanted to try Exchange 2007b2 on this box. I thought about reinstalling the box but feeling slightly lazy I decided to remove Exchange 2003 and install Exchange 2007b2. Except I couldn't.....
"Unexpected error 0x8000ffff" so the dialog box said. On examining the log file in the root of C:, the first mention of error 0x8000ffff was in relation to not being able to find the CD. Except it hadn't asked me for the CD.....
On further examination it turned out (I remember now) that I had mounted the Exchange 2003 install CD iso image using Daemon tools and shared them across the network. The error 0x8000ffff was because it couldn't find the share. I shared the iso from the same machine and same sharename and presto! It worked!
How to control OWA spell checker in Exchange 2003
Microsoft KB article 825430 details registry changes for controlling OWA. I came across it when looking for a solution to the error message "The spelling in this item can't be checked. Please try again later."
I think this problem is caused by organisational proxy servers (seen with both ISA and Border Manager) so there's not a lot you can do about someone elses proxy. Microsoft KB article 820378 has more details.
I think this problem is caused by organisational proxy servers (seen with both ISA and Border Manager) so there's not a lot you can do about someone elses proxy. Microsoft KB article 820378 has more details.
Thursday, 28 September 2006
SuSE 10.1 "eth0 renamed to eth1"
After playing with the bcm43xx wireless module I noticed my eth0 had been renamed to eth1, indeed the message also appeared in dmesg output:
dmesg | grep eth1
eth0 renamed to eth1
After a bit of poking I found duplicates of my network card mac address in the following file:
cat /etc/udev/rules.d/30-net_persistent_names.rules
SUBSYSTEM=="net", ACTION=="add", SYSFS{address}=="00:0d:56:37:58:8c", IMPORT="/lib/udev/rename_netiface %k eth0"
SUBSYSTEM=="net", ACTION=="add", SYSFS{address}=="00:90:4b:12:5f:fa", IMPORT="/lib/udev/rename_netiface %k wlan0"
SUBSYSTEM=="net", ACTION=="add", SYSFS{address}=="00:0d:56:37:58:8c", IMPORT="/lib/udev/rename_netiface %k eth1"
SUBSYSTEM=="net", ACTION=="add", SYSFS{address}=="00:0d:56:37:58:8c", IMPORT="/lib/udev/rename_netiface %k eth2"
SUBSYSTEM=="net", ACTION=="add", SYSFS{address}=="00:0d:56:37:58:8c", IMPORT="/lib/udev/rename_netiface %k eth3"
SUBSYSTEM=="net", ACTION=="add", SYSFS{address}=="00:0d:56:37:58:8c", IMPORT="/lib/udev/rename_netiface %k eth4"
Removing the extra lines (eth1-eth4) and restarting the network caused eth0 to behave again.
Monday, 25 September 2006
How to enable remote desktop.... Remotely!
I recently removed terminal services from my test server as I was through with it and the evaluation license was about to run out. When I tried to connect to my headless server using remote desktop I found that it was disabled by the removal of ts.
Thanks to a blog by cogent free knowledge I was able to enable remote desktop remotely.
Using regedt32, connect to the remote machines registry and change the following key from 1 (disabled) to 0 (enabled):
KEY: HKEY_LOCAL_MACHINE\SYSTEM\CurrentControlSet\Control\TerminalServer
DATA: fDenyTSConnections
No need to reboot, it works straight away.
Thursday, 21 September 2006
Using the bcm43xx driver with SuSE 10.1 and Dell Inspiron 5100
As of Kernel 2.6.17rc a native, reverse engineered, driver is available for bcm43xx range of wireless cards. I have had my bcm4306 rev 02 (Dell Truemobile 1300) card working in my Inspiron 5100 using ndiswrapper for some time but wanted to get the native driver working to play with tools such as kismet.
You'll need the following files:
Kernel.
Novell have not provided a kernel later than 2.6.16 so I had to find a more up to date one. I eventually settled on the 2.6.18rc7 one from the factory distributioncalled kernel-default-2.6.18_rc7_git1-2.i586.rpm. I can't store a copy here because community server does not seem to handle files that big.
Novell have not provided a kernel later than 2.6.16 so I had to find a more up to date one. I eventually settled on the 2.6.18rc7 one from the factory distributioncalled kernel-default-2.6.18_rc7_git1-2.i586.rpm. I can't store a copy here because community server does not seem to handle files that big.
Wireless tools.
The wireless tools provided with SuSE 10.1 do not seem to configure the new wireless driver correctly to I again used the rpm from the factory distribution.
The wireless tools provided with SuSE 10.1 do not seem to configure the new wireless driver correctly to I again used the rpm from the factory distribution.
bcm43xx-fwcutter-004.
This tool is required to extract firware from the windows driver to make the card work with Linux. You can find the file from the makers siteor use this local copy. I have a precompiled version here too.
This tool is required to extract firware from the windows driver to make the card work with Linux. You can find the file from the makers siteor use this local copy. I have a precompiled version here too.
A windows driver.
I had been using thedell driver with ndiswrapper with no problems but it would not work with bcm43xx giving me IRQ errors. I eventually found this onewhich worked great for me.
I had been using thedell driver with ndiswrapper with no problems but it would not work with bcm43xx giving me IRQ errors. I eventually found this onewhich worked great for me.
Proceedure.
1. Install the new kernel using a command similar to 'rpm -ivh kernel-default-2.6.18_rc7_git1-2.i586.rpm'. Reboot into the new kernel but be aware that if you were using ndiswrapper it will no longer work because the new kernel will prefer to use bcm43xx instead.
1. Install the new kernel using a command similar to 'rpm -ivh kernel-default-2.6.18_rc7_git1-2.i586.rpm'. Reboot into the new kernel but be aware that if you were using ndiswrapper it will no longer work because the new kernel will prefer to use bcm43xx instead.
2. Install the new wireless tools. Because Yast2 and a few other pieces of software require the previous version of wireless tools you will get a dependency error on libiw.so.28. I used the following commands to get around this:
'rpm -Uvh –nodeps wireless-tools-29pre10-5.i586.rpm'
'ln -s /usr/lib/libiw.so /usr/lib/libiw.so.28'
'rpm -Uvh –nodeps wireless-tools-29pre10-5.i586.rpm'
'ln -s /usr/lib/libiw.so /usr/lib/libiw.so.28'
3. Install the fwcutter tool from source or by copying the precomiled binary. Installing from source is the standard:
'./configure'
'make'
'make install'
'./configure'
'make'
'make install'
4. Extract the firmware from the wl_apsta.o file using a command similar to:
'bcm43xx-fwcutter -w /lib/firmware wl_apsta.a'
This should place a load of bcm43xx* files into /lib/firmware.
'bcm43xx-fwcutter -w /lib/firmware wl_apsta.a'
This should place a load of bcm43xx* files into /lib/firmware.
5. Use Yast2 to configure your wireless card and reboot.
You should see output similar to the followig:
ifconfig wlan0
wlan0 Link encap:Ethernet HWaddr 00:90:4B:12:5F:FA
inet addr:192.168.0.51 Bcast:192.168.0.255 Mask:255.255.255.0
inet6 addr: fe80::290:4bff:fe12:5ffa/64 Scope:Link
UP BROADCAST RUNNING MULTICAST MTU:1500 Metric:1
RX packets:30401 errors:0 dropped:220 overruns:0 frame:0
TX packets:61069 errors:0 dropped:0 overruns:0 carrier:0
collisions:0 txqueuelen:1000
RX bytes:3078309 (2.9 Mb) TX bytes:87433000 (83.3 Mb)
Interrupt:11 Base address:0xc000
iwconfig wlan0
wlan0 IEEE 802.11b/g ESSID:"thefoleyhouse" Nickname:"Broadcom 4306"
Mode:Managed Frequency=2.412 GHz Access Point: 00:15:E9:E1:C9:15
Bit Rate=11 Mb/s Tx-Power=15 dBm
RTS thr:off Fragment thr:off
Encryption key:XXXX-XXXX-XX Security mode:open
Link Quality=100/100 Signal level=2/3 Noise level=187/100
Rx invalid nwid:0 Rx invalid crypt:0 Rx invalid frag:0
Tx excessive retries:0 Invalid misc:0 Missed beacon:0
lsmod |grep bcm43xx
bcm43xx 427776 0
firmware_class 14208 2 pcmcia,bcm43xx
ieee80211softmac 36992 1 bcm43xx
ieee80211 34760 2 bcm43xx,ieee80211softmac
bcm43xx 427776 0
firmware_class 14208 2 pcmcia,bcm43xx
ieee80211softmac 36992 1 bcm43xx
ieee80211 34760 2 bcm43xx,ieee80211softmac
Subscribe to:
Posts (Atom)